

Capdeville
-
Публикаций
1286 -
Зарегистрирован
-
Посещение
Тип публикации
Форум
Профили
Календарь
Галерея
Все публикации пользователя Capdeville
-
Автопарк Шамана (Коллекция Dark Shamann)
Capdeville ответил в теме пользователя Dark Shamann в Фотографии/Списки - 1:18
Поздравляю с долгожданным красавцОм )) Мерен что надо! Мажорский ))))) -
Оличные Авто! 442-й так вобще супер автомобиль !!! )) С Обновками!)
-
Уууууу... тачка - Класс !!! ) Фотки в обвновленной местности хороши. Там бы Генерала Ли поснимать )))) С Обновой!
-
Вот такой вот текстик на Английском подкинул Klarny. Давайте будем разбираться вместе )) REMOVING WHEELS on 1/18th DIECAST MODEL CARS: This document describes how to remove wheels from specific models. If your specific model is not covered here, look for one that is similar in the list below: either the same model by a different manufacturer or a similar model by the same manufacturer. Study your model carefully, and be patient when removing wheels. I have actually removed all of the wheels as described below, except for a few as specified. Sorry, but any broken wheels or other parts are your responsibility. Print this item for future reference - or email me to ask for more information and a catalog as a WORD document, email address ============================================= WHEEL ATTACHMENT CODE TABLE: I have not found any wheel attachment method that cannot be coded using the table below. Check disk caliper mount (if applicable), as it may be broken if not separated before removing the wheel. SAFETY FIRST USE EYE PROTECTION when following these suggestions. 1. screw (or pin) in center of wheel, with (or without) cover over the screw - cover can be knockoff hub, hub 'axle-nut and pin', etc. a. the screw can be attached to the wheel in two ways: 1) screwed into the end of a hollow axle, through a hole in the middle of the outside of the wheel 2) screwed into the back of the wheel, through the wheel spindle b. the cover can be attached to the wheel in two ways: 1) glued 2) press fit 3) no cover 2. wheel attaches direct to axle - pull wheel off, or pry it off with levers (such as screw drivers). Pulling or prying at an angle will normally break the axle. If possible, normally pry against the wheel back, because there is more surface area than the hub shaft. a. snaps to axle - the end of the axle is larger than the axle, and is inserted through a hole in the wheel (or disk rotor hub) that is the size of the axle, but smaller than the END of the axle. The axle end can be either a solid-nub, or split-end nub. b. axle is glued into back of wheel, or end of axle has splines pressed into back of wheel. Axle attached to wheel turns inside an outer axle. Inner axle is usually metal rod, but not necessarily. 3. captured nut - the nut is not actually a nut, as in 'nut and bolt'. The nut is simply a part, of various shapes. It is a nut in the sense that it holds the wheel on. a. the captured nut is attached to the axle in two ways: 1) glued to the axle 2) snaps to axle as in '2.a.' above b. the captured nut is captured by a latch-piece positioned between the nut and axle / brake backing plate. The latch-piece is attached to the back of the wheel in two ways: 1) glued to the back of the wheel 2) held to the back of the wheel by the tire. In this case the latch-piece is often actually the back half of the wheel. ===================================== EXAMPLE: 3.a.2)b.1) is decoded as follows: 3. captured nut method a. captured nut attachment to axle 2) snaps to axle b. latch-piece attachment to wheel 1) glued to the back of the wheel ===================================== AUTOART CHEVROLET IMPALA SS (including 510 prototype): 2.a. wheel glued to disk rotor, which attaches to axle CORVETTE 1957 SS: 2.a. wheel glued to disk rotor, which attaches to axle CORVETTE 1959 RACING: 2.a. wheel glued to disk rotor, which attaches to axle CORVETTE 1999-2004: front wheel 2.a. (wheel glued to disk rotor, which attaches to axle), rear wheel attachment method is unknown at this time CORVETTE MAKO SHARK: 2.a. CORVETTE MANTA RAY: 2.a. JAGUAR C TYPE: 2.a. wheel spokes will break is pull force is applied directly to the wheel rim. I have been unable to find a way to apply pull force to the wheel center, so I have been unable to remove one of these wheels. Therefore, I am not certain that this is the correct wheel attachment code. JAGUAR D TYPE: 2.a. wheel glued to disk rotor, which attaches to axle JAGUAR XK-SS: 2.a. wheel glued to disk rotor, which attaches to axle BBURAGO - I have not found any Bburago that does not use the 2.a. method. There are a few models where the wheel is glued to the disk brake rotor, which actually attaches directly to the axle (for example FERRARI 360). There are also some models which use a piece, separate from the wheel, to snap onto the end of the axle. This separate piece actually holds the wheel on (for example FERRARI 250 GTO knockoff). BEANSTALK FORD F150 2004: 1.a.1)b.2) center cap has two pins on the back, at 180 degrees apart, at top and bottom of the FORD lettering. Best bet is to pry at the pin locations, in alternation. Use the point of an X-acto #11 knife blade to pry (use eye protection). Provide support under the blade, on the wheel, with a piece of 3x5 card or other, to prevent scratching the wheel. FORD GT 2002: 2.a. rotor is not glued to the wheel. Caliper and mount are not glued to anything, so no precaution is necessary before removing the wheel. CAROUSEL 1 CORVETTE 1969: ?? ERTL AUBURN: 3.a.2)b.2) to prevent breaking wheel wires, remove tire as first step. Then separate two halves of wheel, which are held together with plastic pins and minor glue. Then carefully remove captured nut. Captured nut in this case is just a washer, pressed over the nub on the end of the axle, inside the two wheel halves. FORD F150 HARLEY DAVIDSON: 3.a.2)b.2) remove tire first, or just pry against back of wheel to pop it off. The captured nut is inside the two wheel halves. The latch-piece is the back half of the wheel, and is held to the front wheel half only by the tire. This attachment method differs from the MOPARS method below, only in that the two wheel halves are held together by the tire, and are not pinned or glued together. MOPARS: Dodge, Plymouth, etc. - 3.a.2)b.1) either remove the latch-piece from the back of tire as first step, or else just pry against the back of the wheel until the captured nut releases from the end of the axle. The captured nut cannot be seen when the wheel is completely installed. The captured nut is inside the two wheel halves. Note that the latch-piece actually is the wheel back, and is held to the wheel front by plastic pins. Split the wheel to remove the tire, by cutting the ends off the plastic pins. No glue is used. Prying will sometimes break the split-end nub on the axle. It is possible to make a tool to help remove the latch-piece. Use a piece of tubing that has an inside diameter a little larger than the axle diameter. Remove the wheel front from the wheel back. Then this tubing-tool can be pressed over the end of the axle split-end. This will compress the split-end, making it small enough to pull the wheel-back / latch-piece off the end of the axle along with the tubing-tool. Just pull on the back of the latch-piece. The tubing-tool can be formed by using thick plastic tubing. Then chamfer the end of the tubing enough to push over the end of the axle split-end. Chamfering can be done with either a drill bit, chamfer drill-bit, or careful use of an X-acto blade. EXOTO COBRA DAYTONA 1964/65: 1.a.1)b.2) CORVETTE GRAND SPORT ROADSTER 1964/65: 1.a.1)b.2) JOUEF / EAGLE'S RACE FERRARI P4 330/412: 2.a. KYOSHO BMW LMR 1999: 1.a.1)b.1) CATERHAM: 1.a.2)b.3) (front wheel is held w/ a glued nail rather than a screw, from the back side of the wheel), rear wheel attachment method is unknown. COBRA SHELBY 427: 2.a. while this code is technically correct, some description is in order. The only way I have found to remove these wheels is either pull directly on the wheel (really hard), or pry between the wheel hub and the disk rotor (or axle backing plate). Prying is easier, but more likely to break the axle, because it is really hard to pry with equal force on two sides of the hub. And also because the wheel hub is barely larger than most model axles (meaning the axle is quite small), and fits very tightly against the disk rotor. The attachment method for these wheels is as follows. The wheel hub shaft is hollow, and fits over the axle. The axle is also hollow. A headed pin is in the wheel hub shaft, sort of like a plastic straight pin. This pin is inserted from the back side of the wheel (front side of wheel is solid). The pin-head is against the back of the wheel center, in a slot, and keeps the pin from falling out of the hub shaft (or being removed from the hub shaft). The end of this pin which points toward the center of the car has a nub. A nub is a part which is larger than the pin-shaft. This nub is forced into the hollow axle, until it fits into a larger opening just past the disk rotor. I do not consider this attachment method to be a type 3 captured nut method. While the attaching pin might be considered a captured nut, there is no latch-piece separate from the wheel or pin. There are only the wheel, and the pin holding the wheel to the axle. LANE MUSTANG SHELBY 1965/66: 3.a.1)b.1) the latch-piece forms the disk brake rotor back (black), and is glued into the back of the wheel. The captured nut forms the front side of the disk brake rotor (silver) and caliper, and is glued to the axle. Separate the latch-piece from the wheel by debonding the seam with either lacquer thinner or super glue remover. Use this same technique to debond the captured nut from the axle. The spare tire wheel has a latch-piece attached to the back, and the latch-piece is glued to the trunk floor. There is no captured nut. Practice on the spare wheel to learn how the other wheels are mounted. MAISTO - most models use the same method. A hollow wheel hub shaft is a press fit over a white (usually) sleeve. The white sleeve is also hollow and fits over an axle. The sleeve is held to the axle by a nub on the end of the axle, and a hole in one end of the sleeve smaller than the inside diameter of the sleeve. When the wheel is removed, usually the white sleeve stays on the axle. However, sometimes the nub on the axle breaks and leaves the white sleeve inside the wheel hub shaft. Then it is not possible to replace the wheel so that it can rotate freely. To prevent damage during removal, use two flat bladed screw drivers and pry only between the wheel hub and the axle backing plate. Do not pry against the white sleeve, or it may break the axle nub. Sometimes the white sleeve will separate from the axle without breaking the axle-nub, and remain inside the wheel hub shaft. Then the wheel can be replaced on the axle, and still rotate. If the press fit between the wheel hub shaft and the white sleeve is not too tight, then it is possible to remove the wheel by simply pulling it off. This is worth trying first. MERCEDES BENZ ML320 and ML55 AMG: 2.a. on the ML320 the disk rotor attaches to wheel hub shaft, and rotates with wheel. On the AMG the disk rotor attaches directly to the axle backing plate, and does not rotate. Neither method affects the wheel attachment. The wheel hub is a press fit over the white (sort of tan) sleeve. The white sleeve slips over the axle nub. MERCEDES BENZ 300 SLR 1955: 2.a. no white sleeve, wheel fits directly over axle nub. Knockoff piece is press fit into the wheel hub. It is not necessary to remove the knockoff before removing the wheel. In fact this will probably damage the knockoff. After removing the wheel, push from the backside of the wheel with a small pin punch, to remove the knockoff. If unable to remove the wheel by simply pulling, try prying between the wheel hub (larger than normal) and the axle backplate. MERCEDES BENZ 500SL AMG: 2.a. MATTEL DODGE CHARGER 1969: front wheel 1.a.2)b.3), rear wheel 2.b. (single metal axle for both rear wheels, rotating inside the plastic rear axle and differential) FERRARI 360: 2.a. the rotor is glued to spindle / axle backplate FERRARI F40: 2.a. the rotor is separate from wheel, and does not turn because it has a slot(s) which fits a projection on the axle backplate MINICHAMPS MERCEDES BENZ 500SL 2004: 1.a.1)b.1) this is a guess since I cannot find a way to remove the center cap without damaging it. MOTOR MAX CORVETTE MAKO SHARK: 2.a. DODGE RAM 1500 QUAD CAB 2003: 2.a. the wheel hub shaft is a press fit into the disk rotor hub. The disk rotor is held to the axle by a steel headed-pin pressed into the end of the axle. Simply pull to remove the wheel. Sometimes the wheel will separate from the disk rotor. In that case, use pliers to pull the steel pin, allowing the disk rotor hub to slip from the axle. Sometimes the wheel hub shaft will remain in the disk rotor hub, and the disk rotor will separate from the axle. Then it will be necessary to remove the disk rotor from the wheel, because it will not be possible to simply push the wheel/disk rotor back onto the axle. This is so because the head of the steel pin does not rest against the back side of the wheel hub, but instead there is a space. Trying to reattach the wheel will not force the pin into the axle far enough for secure the wheel. Separating the wheel and the disk rotor can be difficult without damaging the parts. However, since probably the reason for removing the wheels is to replace the too small disk rotors, better to damage the disk rotor than either the disk hub or wheel hub (which would cause problems putting them back together). To separate, try holding the disk rotor with pliers and twisting the wheel. Or try lacquer thinner to separate them. ROAD LEGENDS COBRA SHELBY 427: see same model by Kyosho
-
AutoWorld всё таки "тужатся" потихоньку )) Переиздают хорошие ERTL-овские версии (судя по Кугару) с отличными изменениями ! по ссылке полный список новинок до июня следующего годаhttp://www.autoworldslotcars.com/americanmuscle/vehicles.asp http://www.autoworldslotcars.com/americanmuscle/images/vehicles/amm933.jpg http://www.autoworldslotcars.com/americanmuscle/images/vehicles/amm936.jpg http://www.autoworldslotcars.com/americanmuscle/images/vehicles/amm935.jpg http://www.autoworldslotcars.com/americanmuscle/images/vehicles/amm940.jpg http://www.autoworldslotcars.com/americanmuscle/images/vehicles/amm937.jpg http://www.autoworldslotcars.com/americanmuscle/images/vehicles/amm934.jpg
-
АвтоФотоАльбом (capdeville)
Capdeville ответил в теме пользователя Capdeville в Фотографии/Списки - 1:18
Ага, и у меня цитировать не получается (( Абсолютно согласен на счет изгибов Это ж Хаммер, он и должен быть серьезным парнем :D Вадя - Спасибо ;) -
АвтоФотоАльбом (capdeville)
Capdeville ответил в теме пользователя Capdeville в Фотографии/Списки - 1:18
вот: 1500х1000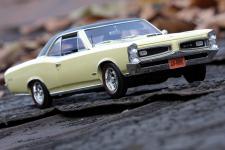

-
JAGUAR STEVE MCQUEEN'S JAGUAR XKSS AUTO ART 73526 Сколько у этого МакКвина тачек? )))) Ягуары вещь! Квиновский, ЛеМановский и ЙатМинговский особенно понравились.
-
АвтоФотоАльбом (capdeville)
Capdeville ответил в теме пользователя Capdeville в Фотографии/Списки - 1:18
Дык, вроде только у тебя такая проблема... больше никто не жаловался ;) Удали пожалуйста из своего поста quote на мой пост - а то слишком много получилось одинаковых фото на одну страницу. Ты то их не видишь... а у других винигрет на странице :D ;) Спасибо Спасибо! Те которые не накрыше - лёжа га :D было неудобно ))) Да, автомобиль в поряде Правда я изначально хотел 77 года, как у Ксандера в ХХХ... но и такой пойдет.) Спасибо! Ок. Залью ;) А барашек на фотке... те кто интересуются Мускулами уверен в курсе, в старой рекламе Понтиака тигр под капот залазит - у меня тигра не оказалось, решил стебануться - засунул овцу ))) без намёков конечно, просто прикол. :P -
АвтоФотоАльбом (capdeville)
Capdeville ответил в теме пользователя Capdeville в Фотографии/Списки - 1:18
http://www.xpressgloballogistics.com/images/pontiac_logo.gif 1966 Pontiac GTO (Gran Turismo Omologato) - Highway 61 - 1/18 - рубрика "АвтоФотоМодели" Введение: Общие данные Производитель: Pontiac Division Года пр-ва: 1966 Класс: mid-size muscle-car Дизайн Тип кузова: купе, двудверный хардтоп, конвертибл Компоновка: задний КПП: МКПП: 3 или 4 ступени, АКПП 2 или 3 ступени Двигатели 389 с.i./6,375 л., 335 л.с. Характеристики Размеры Длина: 5235 мм Ширина: 1900 мм Высота: 1350 мм Колёсная база: 2900 мм Скоростные характеристики Разгон до 100 км/ч: 6,8 с. Макс. скорость: 195 км/ч Другое Масса: 1720-1770 в зависимости от модификации (самая легкая - купе, тяжелая - кабриролет) *** Первоначально маслкары просто переделывались заводским способом из самых обычных автомобилей. Например, Pontiac GTO в первый год своего выпуска был лишь одной из комплектаций в модельном ряду Pontiac Tempest / GranPrix / Le Mans. В комплектацию входили: 325-сильный V8 рабочим объемом около 6,4 литров (389 кубических дюймов), более жесткая подвеска, четырехступенчатая механическая КПП взамен трехступенчатой АКПП, отличительный внешний хромированный декор GTO, раздельные передние сидения, консоль, тахометр, и так далее. Корпоративная политика General Motors того времени не предполагала установки таких мощных двигателей на небольшую, по американским меркам, машину. Мощные двигатели были до этого уделом огромных «полноразмерных» «дорожных крейсеров». Похожих ограничений до этого момента придерживались и остальные компании «Большой Тройки». Однако, коммерческий успех смелого эксперимента «Понтиака», а в первую очередь топ-менеджера подразделения D.De Loreanа, вызвал к жизни целый класс небольших и дешевых, но очень мощных машин. На следующий год GTO уже стал самостоятельной моделью. Вскоре, у конкурентов появились такие автомобили, как Ford Fairlane GT, Ford Torino (на агрегатах Fairlane), и многие другие. GTO имел неудовлетворительную аэродинамику, плохую управляемость, барабанные тормоза без усилителя в базовой комплектации, довольно небольшую максимальную скорость, зато разгонялся до 97 км/ч за 6,8 секунд. http://cs1636.vkontakte.ru/u9801483/96410766/x_d4f7c335.jpg http://cs1636.vkontakte.ru/u9801483/96410766/x_bf235dc6.jpg http://cs1636.vkontakte.ru/u9801483/96410766/x_5e4e60c4.jpg http://cs1636.vkontakte.ru/u9801483/96410766/x_5b2ba7d9.jpg http://cs1636.vkontakte.ru/u9801483/96410766/x_505aee0f.jpg http://cs1636.vkontakte.ru/u9801483/96410766/x_1daff4da.jpg http://cs1636.vkontakte.ru/u9801483/96410766/x_989950c6.jpg http://cs1636.vkontakte.ru/u9801483/96410766/x_49dfc476.jpg http://cs1636.vkontakte.ru/u9801483/96410766/x_9cb50c85.jpg http://cs1636.vkontakte.ru/u9801483/96410766/x_cb8ac2e1.jpg http://cs1636.vkontakte.ru/u9801483/96410766/x_228226dc.jpg http://cs1636.vkontakte.ru/u9801483/96410766/x_fa4bae68.jpg -
АвтоФотоАльбом (capdeville)
Capdeville ответил в теме пользователя Capdeville в Фотографии/Списки - 1:18
Полтергейст на форуме !!! :P :lol: -
Мммм... хорошая версия 70-го !!! Черным с красным - вещь!)
-
АвтоФотоАльбом (capdeville)
Capdeville ответил в теме пользователя Capdeville в Фотографии/Списки - 1:18
Хех )) Забавно :D А то что китайцам отдали все права - это меня не очень порадовало... хотя, кто знает... китай захватывает мир :P PS - Владимир, почему удалил свой комментарий? :o -
АвтоФотоАльбом (capdeville)
Capdeville ответил в теме пользователя Capdeville в Фотографии/Списки - 1:18
Этот тоже процентов на 70-80 пластиковый ((( Из-за этого очень легкий. Формат не 18 - однозначно минус. А вот в остальном - очень даже приятная модель... я доволен. Эта Маиста Made in Thailand, Premiere Edition. Очень качественная Маиста - ремни безопасности, мелкие надписи, детальки (в том числе и на движке). Даже решетка радиатора не глухая! )) хоть толку от этого и не много. :P Спасибо !!! Он мне и в реальности понравился. ;) -
Ты наверное хотел сказать Челенджер )) Мне бы тоже интересно было на него взглянуть.)
-
Хорошая модель! Отличные фото !!! С Обновкой )
-
Мои последние приобретения (malyhaa)
Capdeville ответил в теме пользователя MALYHAA в Новости из моей коллекции - 1:18
Братки забавные )) Давай их вместе с тачками !)) -
АвтоФотоАльбом (capdeville)
Capdeville ответил в теме пользователя Capdeville в Фотографии/Списки - 1:18
http://www.wyoming-auto-dealers.com/logos/hummer-logo-white.jpg Hummer H1 (4-Door Wagon) - Maisto Введение: История марки до 2009 года была неразрывно связана с автопромом США. Марка зародилась в результате конверсии американского армейского вездехода HMMWV M998 (High Mobility Multipurpose Wheeled Vehicle), сокращённо «Ха́мви» (англ. HUMVEE). Хаммер H1Разработкой внедорожника занималась североамериканская компания AM General. Начало проекту HMMWV было положено в 1979 году. Целью проекта была разработка автомобиля, полностью соответствующего немалым армейским требованиям. (По одной из версий, компания просто оказалась в удачном месте в удачное время, так как конкурс на создание внедорожника для армии США первоначально выиграла компания «Ламборгини» с моделью LM Cheetah. Министерство обороны США решило не отдавать тендер в руки европейцев, хотя итальянский проект почти полностью удовлетворял их требованиям, за исключением высокой стоимости производства. Чертежи внедорожника «Ламборгини» были переданы для переработки AM General без разрешения их создателей, так, в результате, и появился первый «Хаммер»). В 1981 году, «Хамви» был принят на вооружение США, и стал всемирно известным после участия в войне в Персидском заливе против Ирака. Сегодня «Хамви» стоит на вооружении более 40 стран мира, и производится в различных модификациях, что делает его поистине многоцелевым военным транспортом. В 1992 году, началось производство гражданской модели «Хамви», которая и получила название «Хаммер H1» (англ. Hummer H1, название появилось в результате смешения «Humvee» и «Hammer» молот). Производством гражданской модели занялась североамериканская компания General Motors. Гражданская версия вездехода отличалась от военного всего несколькими изменениями. Несколько «Хаммеров», принадлежащих грузинским ВС были захвачены российской стороной в ходе Войны в Южной Осетии и затем отправлены для детального изучения на российскую военную базу. Летом 2008 года, в связи с ухудшающимся финансовым положением General Motors и сильным падением спроса на продукцию Hummer, корпорация приняла решение о продаже марки. Почти год велись переговоры с потенциальными покупателями из Китая, Индии, России и других стран. В итоге выбор был остановлен на китайской компании Sichuan Tengzhong Heavy Industrial Machinery Co, с которой 2 июня 2009 года (через день после объявления о банкротстве GM) был подписан Меморандум о взаимопонимании - предварительное соглашение о продаже бренда. Полностью сделка должна быть закрыта до конца III квартала 2009 года. Также планируется заключить долгосрочное соглашение, по которому General Motors на 2 года станет подрядчиком по производству моделей H3 и H3T на заводе в Шривпорте (Луизиана). После 2010 года новый владелец будет самостоятельно определять дальнешее развитие бренда и разработку новых моделей. http://cs1636.vkontakte.ru/u9801483/96410766/x_97c2ac49.jpg http://cs1636.vkontakte.ru/u9801483/96410766/x_1ca3bbf7.jpg http://cs1636.vkontakte.ru/u9801483/96410766/x_725cdb23.jpg http://cs1636.vkontakte.ru/u9801483/96410766/x_a4a7b54b.jpg http://cs1636.vkontakte.ru/u9801483/96410766/x_9e11539e.jpg http://cs1636.vkontakte.ru/u9801483/96410766/x_2ba7d3c2.jpg http://cs1636.vkontakte.ru/u9801483/96410766/x_664b4a6b.jpg http://cs1636.vkontakte.ru/u9801483/96410766/x_7d7b183d.jpg http://cs1636.vkontakte.ru/u9801483/96410766/x_1651e71a.jpg http://cs1636.vkontakte.ru/u9801483/96410766/x_58659adc.jpg http://cs1636.vkontakte.ru/u9801483/96410766/x_d4c89130.jpg http://cs1636.vkontakte.ru/u9801483/96410766/x_1c08b051.jpg http://cs1636.vkontakte.ru/u9801483/96410766/x_e58f7cb6.jpg http://cs1636.vkontakte.ru/u9801483/96410766/x_23dd4b4d.jpg http://cs1636.vkontakte.ru/u9801483/96410766/x_34079f7d.jpg http://cs1636.vkontakte.ru/u9801483/96410766/x_03d02227.jpg -
Ага )) Так это тоже красиво ))
-
С Обновами Костя !!! И немцы и итальяшка и Линкольн - хороши ! Лучший, на мой вгляд, Пассат ))) У Х5 фары светяться? :o
-
Если желание есть и место позволяет - пусть будет, почему нет... Очень даже симпотичный персонаж ! ;)
-
Мои последние приобретения (philips)
Capdeville ответил в теме пользователя Philips в Новости из моей коллекции - 1:18
Супер !!! -
Красивые Мерсы !!! Обоины красивые MERCEDES-BENC CLK-GTR MAISTO - это тот самый? :P
-
Вот и я заимел небольшой гаражик
Capdeville ответил в теме пользователя Manjak-Lubitel в Фотографии/Списки - 1:18
Просто, думаю, когда СМС поняли что их сигары на колесах будут продаваться очень плохо - они решили взять качественными фишками... так и случилось... теперь сосиски не сосиски а покупать надо, это же СМС :D :D :D -
Хм... интересное получается дело )) Тогда очень надеюсь что мне Супер Би ЕРТЛовский (который счас в пути) понравится так-же сильно как тебе РодРаннер, они ведь так похожи ))

